
289 posts
Latest Posts by itsmeif - Page 8

Basics of Painting by Rashed AlAkroka
Follow the artist on Facebook!
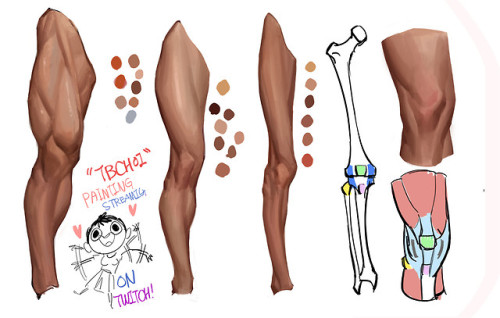


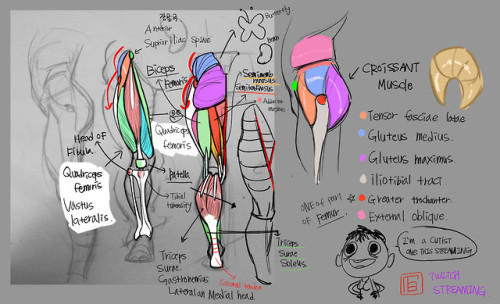
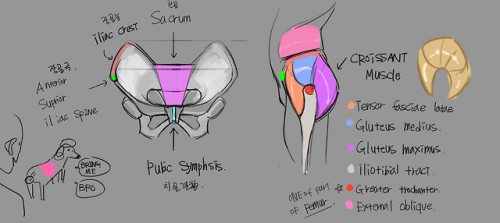


https://www.twitch.tv/tbchoi
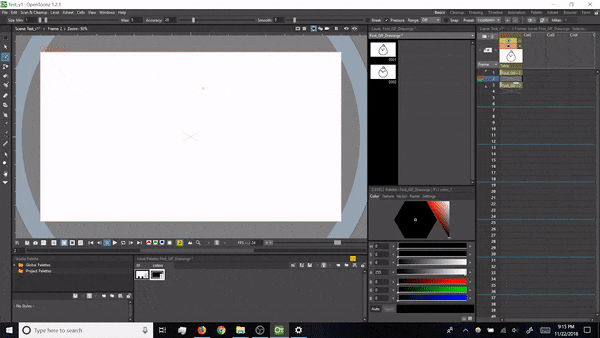
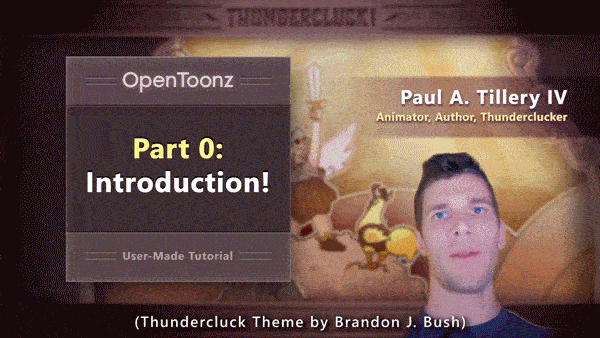

THUNDER THURSDAY #85: OpenToonz Tutorials Are Live!
Hey folks! For those wanting to learn OpenToonz, thanks again for your patience, and behold: my first few tutorials are online! Here’s the introductory collection (~35min total), or check below for links to individual sections :D
I’ve made a YouTube playlist with individual videos, and here are their separate links (times approximate):
Part 0: Introduction (2min)
Part 1: Installation (2min)
Part 2: The Startup Menu (2min)
Part 3: The Interface (3min)
Part 4: Levels & Drawing (7min)
Part 5: Drawing Frames (6min)
Part 6: The X Sheet (5min)
Part 7: Saving (2min)
Part 8: Exporting a GIF (7min)
ENJOY! And if you have questions, feel free to ask (either here, or in the YouTube comments). Thanks for watching!
Paul

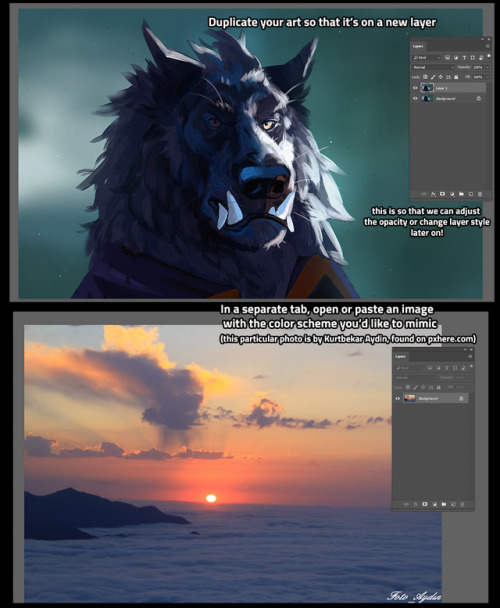
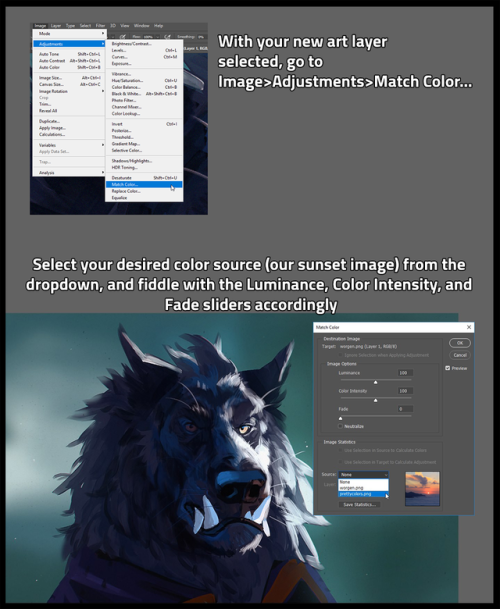
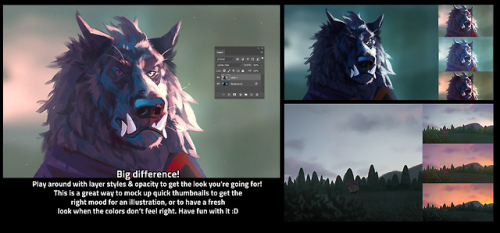
I’m sure a ton of people already know how to do this, but I only learned recently, so I wanted to share one of my favorite thumbnailing tricks! Color matching is SUPER helpful to quickly map out potential color schemes :D
[EDIT] this is in Adobe Photoshop, sorry for forgetting to mention that!


I have no question, there are two dozen identities that live in that body with you.
+ bonus

Negan/Rick Fic List
(Last Updated: April 28, 2017)
List of fics I personally loved. Made this so it’s easier for me to find them. Prolly the closest thing to a fic rec list I can do (I’M SORRY)…
Chaptered (Complete):
Shelter from the Storm -AU Rick falls in love with Carl’s asshole coach
The Truth -Negan asks Rick to marry him
Lucky Like a Black Cat -AU Negan and Rick are neighbors
Riding Shotgun -AU “little southern boy” meets greaser
The Working Dead -Department Store AU onesided Negan/Rick with tons of characters around them. (cathartic. seriously. I know it’s scary since it’s got so many characters, chapters and stuff going on and it’s onesided. but worth it.)
Cat and Mouse -assassins and hitmen AU
5 People Who Noticed Rick Was in Love With That Asshole + The One Time He Noticed it Himself -AU Rick being an oblivious dork
Red Canyon Outlaw -AU deputy sheriff x outlaw
What Kind of Man -Highschool AU
Blue Jello -AU Negan and Rick meet in a cruise ship
Perebor -Rick endures being abused by Negan’s men, assuming Negan knows of it, and it turns out he didn’t (non-con elements)
Please and Thank You -subtle take on alpha/omega AU
Devil’s Backbone -AU Rick falls for Carl’s coach, but something about the man’s past just doesn’t quite add up
Chaptered (Ongoing):
All the Hallowed Roads -If Negan met Rick in TWD season 1
Excess -Negan coerces Rick into marrying him amongst other things (PRETTY DARK.)
Ready for Another Life -canonverse!Rick wakes up in an AU where he’s been in a relationship with Negan for years (SAD STUFF AHEAD)
Bloodsport -Negan asks Rick to marry him (the Sanctuary/Savior characters as the supporting cast)
The New World Order -if Rick met Negan in TWD season 2 (Negan’s already with The Saviors)
Your Body’s Borders -If Negan was with Abe’s group, and happens upon Rick who seems extremely troubled post-Terminus
hallelujah -AU Rick picks up a mysterious hitchhiker (Non-con, VERY VERY DARK and violent)
Red riding hood and the big bad wolf -Childhood friends AU
All Roads Lead to Terminus -If Negan was in a different group searching for Terminus and ends up defending Rick’s group/the prison from the Governor’s attack
Heart In A Blender -AU friends to lovers
The Delegation of Power -Simon takes an interest in Rick, handling things a little differently when Negan’s not around (Non-con)
Parallax -AU Sci-fi, Rick and Negan are part of a crew sent to investigate a distant planet, which their ship crash lands in. Stuck, they have to work together to survive and find a way out
Oneshots:
Good Feeling -Soulmate AU
Eat Fresh -Subway AU
The Devil and The Deep Dark Ocean -Things happen in the Alexandria church.. (SASSY AS HELL smutfic)
Big Plans -AU Valentine’s Day fic
Listen to Me -AU Negan as a radio host
Like Magnets -Negan’s trying to make amends
Part Of The Family -AU Rick proposes to Negan
Negotiations -Negan and Rick roughly going at it
No restraint -AU mutual pining
Fic Collections/Answered Prompts:
By @hatterized :
7-“I almost lost you.”
27-“I’m pregnant.”
40-“Have I entered an alternate universe or did you really just crack a smile for me?”
49-“Well this is awkward…”
9-“I missed you so much.”
17-“Because I love you!”
18-“You’re the most beautiful thing I’ve ever seen.”
if Negan’s spaghetti thing happened as planned
By @neganstonguething :
14-“Hey, I’m with you, okay? Always.”
44-“If you die, I’m gonna kill you.”
Blood is Thicker, Baby - A Collection of Answered Requests
1-“I’m in love with you.”
11-“I thought you didn’t want me.”
16-“Why haven’t you kissed me yet?”
11- “I think I picked up your coffee by mistake.”
99- “Your hair is so soft”
45- “I had a nightmare about you and I just wanted to make sure you’re okay.”
Burnt Dinner
80- “Teach me?”
By @psychosexualnegan
a little AU on a plane
Negan gets shot
By @ocegion
Rick’s sick and Negan takes care of him
“One shot where Rick is saved by Negan after he stops breathing and it’s hella awkward.” (I see what you did there anon ;D )
neganstonguething
grab-my-boner
psychosexualnegan
That’s it for now. There are other fics that I’m interested in and currently following, but I’m still waiting to see how they go and how I feel about them??? So I won’t add them here for now… Will be constantly updating this post I guess.
Casey’s Power In Glass
The Beast: *Is about to eat a person*
Casey:


Christmas lights. Tutorial by Anastasia-berry
Support the artist on Patreon!

Sketching Phases: Princess Enne by Nsio
a quick grass tutorial
I’ve never really wrote a tutorial before so apologies if this is bad
1. okay first thing I do is pick three colors, a mid, dark, and light. I like to check the colors in greyscale to make sure there’s enough contrast between each one.
I then plop down a blob of whatever my middle tone color is.

2. next, I take my dark color and just sort of randomly place it around. I try to make sure there’s a good amount of both the mid and dark tones spread throughout. I personally like to keep it kinda messy. I also have pen pressure on for both brush size and opacity, so I can have some blending action going on.

3. for the next step I do the exact same thing as before, except with the light color.

4. aight this is where we start adding details. see how you just have a bunch of colors and edges where two colors meet? use the eyedropper and go to an area where two colors meet, eyedrop a color, and then use that color to draw in your grass blades. I do this at every point where colors meet. should note I personally like to use a square brush, but you can really just use anything.

5. you can technically stop at the last step if you’re going for a more simple look, but to add more details I go to the “empty” areas of solid color and just draw in random strokes using a color nearby. it’s just a way to fill up the empty space.

6. basically more of the same idea of eyedropping and drawing. for more variety so things look interesting, I like to add random plant shapes.

7. and so the grass doesn’t look too plain, I add random dots of color and pretend it’s flowers and stuff.

and there you have it, this is how I approach drawing grass.


i did this tutorial ages ago in DA and i wanted to share this with you guys on tumblr <3
my DA click here
1 - 2
Skull Oil Painting 💀 Still Life from Start to Finish

By Pavel Sokov
Setup and Preparation Stages
Before I start a painting, I like to come up with a couple of thumbnails to nail down the composition. I do these from imagination usually. So in these ones, I played with the placement of the skull, the direction of the lighting, and the orientation of the canvas. After coming up with these 4 thumbnail sketches, I got kind of a better idea of what I actually want from my painting.
Also, it sort of helps to have a thumbnail completed to use as reference when I start my painting because if I don’t have anything to look at it’s possible that when I start from scratch on my canvas, my subject will end up too big, or even worse, run off the page or something.

Composition is a bit of a feeling thing along with some guidelines. It’s not like stiff rules that you must follow. So having said that, I think I like sketch 1 and 3 the most.
You know, since the color temperature plays such a big role, I digitally painted this sketch with some invented color before actually making the setup, just to give an idea of what kind of mood this painting would be. And it also gave me an opportunity to plan some of the painting methods and steps that I’ll use in the actual painting process.


Okay, so with the sketches in mind, let’s put together the setup that I will paint from today.
Execution of the painting
So a big challenge to overcome here with this skull is that I want to paint it in the dark for a more dramatic and moody atmosphere since it’s Halloween and all, but at the same time, I want myself and my easel to be in the light so I can see and we can make this video.
Sadly, the candle doesn’t provide a strong enough light during the day, so we’re going to use a warm lamp instead.
Since we don’t want to burn the house down though by lighting that black box on fire, I think our candle shouldn’t be lit at the beginning stages of the painting.

I’m using a portable paintbox today that makes it convenient for me to paint anywhere I go.
For my brushes, I plan to use a lot of bristles because I want to load this painting up with a lot of thick paint, but I also packed a few softer brushes to get some soft edges in there too.
As my painting surface today, I am using an 11×14 linen panel. It’s actually one of my favorite sizes for life paintings.
I paint with a few different brands of oil paint, but there’s no need to name them or be concerned with what they are. What’s really important about that is that they’re professional grade and they’re not the student grade which are very difficult to paint with. It just doesn’t work, it’s like toothpaste, so just don’t even get it.
Okay, let’s squeeze out our paint. And don’t be afraid to use a lot. For the longest time, I’ve been so shy with squeezing out my paint. It’s been taking me years to paint thicket and thicker, and I gotta tell you, if you can skip all these years of being shy and just get straight into it and load up a lot of paint, it will save you a lot of trouble.
On my palette today we have:
Titanium White, Warm White, Cadmium Yellow Light, Cadmium Yellow Medium, Cadmium Yellow Orange,Yellow Ochre,Transparent Yellow Oxide, Cadmium Red, Transparent Red Oxide, Transparent Brown Oxide, Raw Umber, Alizarin Crimson, and Cobalt Blue.

Underpainting and Drawing Stage
The very first thing I like to do when starting a painting is to tint the canvas. But you have to select your tinting color wisely, because it’s going to provide the underlying temperature to the whole piece. I often let this initial tint show through all the way to the end of the painting, particularly in the shadows.

In this case we have a very warm light on our subject so we can expect our painting to be pretty warm. I’m going to tint this canvas with that in mind by using something really warm like transparent red oxide, and I will mix it with a bit of Cadmium Yellow Medium in the area where the candle will go because later, all this warm underpainting should give this skull a nice inner glow. I am diluting my paint with gamsol here when I do my initial washes, because makes the paint behave like a watercolor, which is perfect for making a stain.
Drawing the Lay-in
Okay, so now that our canvas is tinted, we can start to draw our linear lay-in on top of our stain. My favorite tool to do that with is actually a hard bristle brush. The reason why is that those stiff hairs, they allow me to get nice straight lines which are the exact type of lines that I find helpful at this stage to simplify the contours of everything that I’m drawing and to find those big shapes.
Don’t worry, we’re going to complicate these lines later when we go to paint them!
As you draw your lay-in, don’t forget to focus on the big shapes and the proportions of what you’re drawing. Don’t get carried away on details and things like that because it’s way too early at this stage. Simplify everything to its most basic elements. Find the big shapes and don’t mind the secondary forms for now. It also kind of helps to keep your horizon line in mind when you draw your lay-in. For example, in my case, I’m sitting below the skull and looking up at it.

You have to ask yourself, are you looking up at the your set-up, or are you looking down at it? And, whatever the answer is, you have to design your lines with that in mind.
So if you’re noticing that your drawing is off at this stage, don’t be shy to move lines around until you get it right. Trust me, you’re gonna be saving yourself a lot of headaches if you fix things at this early stage than if you try to fix them later on when you have a lot of opaque paint down on your painting.
So right now I’m filling in the dark shapes on my underpainting because I find that it helps me see my mistakes better when I fill in the big dark shapes. With these dark shapes filled in, it’s much easier to judge the distances on your drawing.
Opaque Painting Stage
At this point I often like to take a kneadable eraser, or more often a napkin, and rub out the lightest areas. This helps me establish the light source a lot sooner before I even lay down the opaque paint. Just make sure to do this before your stain is dry, or else you won’t be able to do it anymore. You usually have about 10 minutes max depending on your surface before your wash dries, so be careful.
My goal here is to establish the big values, shapes and color temperatures as soon as I can, so to do that, I am going to cover the entire skull with some opaque paint, aiming primarily to tell the story of the lighting that’s hitting our skull. I am thinking a lot about color temperature. Our primary light is warm, so I’m mindful that my the parts that are in the light are going to stay warm. Often times, students want to lighten an area, so they grab a bunch of white. White is actually the coldest color, so the result of that is that the value of the area goes up and it does become lighter, but at the same time, the temperature goes a lot colder.

This is actually great if your subject is in a cold light, like maybe a North lighting window. But in our case, our subject is in a warm light, so that’s no good for us. When you want to lighten an area that’s in the light, consider using a color to lighten that area. In this case, to lighten my mixtures, I’m going to include some cadmium yellow medium, cadmium yellow, and transparent yellow oxide in my light mixtures to keep it warm. But conversely, if you want to darken an area, a lot of students reach for the black to darken things, and that creates a cold mixture as well. Try darkening a shadow with a warm dark. Something like transparent red oxide, transparent brown oxide, or alizarin crimson.
While you’re putting down that initial opaque paint, a good principle to work by is to paint the lights thicker and the shadows a little bit thinner. So that means you can’t be afraid to lay down some serious paint in the lights. If you keep the shadows more thin and flat, then the lights are going to feel more luminous in comparison. And I also love to let my warm underpainting show through in places in the shadows.
When you have dramatic lighting like this, you are bound to see a lot of contrast. Let’s make sense of all of it this way:
Since most of our subject is lit, make sure that the amount of values you use in lights is higher than in the shadows. In other terms, make the shadows more flat and have less values, like you could make the shadows just one value so that it looks a lot simpler than your halftones and your lights. As a result, the shadows will have less information in it than the parts that are lit.
I am thinking of the skull as an egg, with the closest part receiving the most light, and the parts farther away receiving the least amount of light. If the underlying “egg” of the skull reads well, then you are gonna be in good shape!

Our halftones are the most chromatic and the most information-dense parts. So in our case they are going to be the warmest parts of the skull. The lightest lights are pretty washed out, but they’re still warm.
Finishing Stage
To see the finishing touches make sure to watch the video below.


read the full comic!
i have watched approximately 54535624664534 of these so here is my Ode to Hallmark Christmas Movies


~“Who Has the Best Shoes???”~
Part 2/2
There are many A.I. that have Jacob, John’s, and other characters’ same shoes.
*We all get the same awesome shoes (Pratt, Hudson, Mayor, Rook, and the Sheriff all have the same shoes). I plan on getting shoes similar to Pratt in real life. They are cowboy boots.


~Who has the Coolest Shoes???~
Part ½
~Who has the Coolest Shoes???~
Part ½
+40 Pixel Art Tutorials
A growing collection of animated Pixel Art Tutorials by Pedro Medeiros (@saint11) of Studio Miniboss (they previously worked on TowerFall and are currently working on Celeste and Skytorn)
All +40 Pixel Art Tutorials can be found on blog.studiominiboss.com/pixelart (10 Pixel Art Tutorials are posted below)


Canine Paws Study by Chickenbusiness
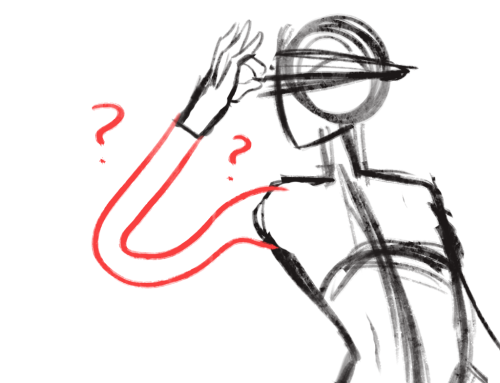
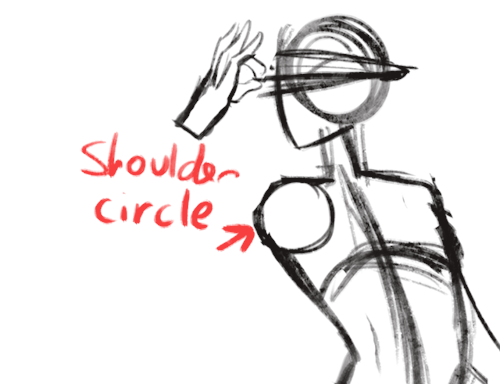
how to draw arms ? ?
how to draw arms ? ?
Today’s episode on the Powow Workshop (Formerly Stringbing Workshop), I introduce the animation breakdown, what it is, and how it can be used.
Please check out my patreon page and give it a support: https://www.patreon.com/StringBing
Gumroad (Buy exclusive tutorial material): https://gumroad.com/stringbing
Music: Boom de Boom - Aaron Lieberman FunkDown - MK2 Happy Mandolin - Media Right Productions


Was getting some of my images ready to be made into prints today so I thought I’d make a guide for anyone else interested in making prints of their work :D


idk if i’ll ever go more in-depth about each of the topics (because,, there’s a LOT of stuff to cover,, o<-<) but for now i just wanted to put this up anyways!! :,-o


some friends wanted me to share my brushes so here they are!
Some Photoshop Tips
I’ve been getting quite a few asks about the process for the patterns in my stylized artworks, so I decided to put together a couple of tips regarding them.
Firstly, what you need are
— CUSTOM BRUSHES —
Most of the patterns I use are custom brushes I made, such as those:

For the longest time I was convinced making brushes must be super extra complicated. I was super extra wrong. All you need to start is a transparent canvas (2500px x 2500px max):

This will be your brush tip. When you’re satisfied how it looks, click Ctrl+A to select the whole canvas and go to ‘define brush preset’ under the edit menu

You will be asked to name your new glorious creation. Choose something that describes it well, so you can easily find it between all the ‘asfsfgdgd’ brushes you’ve created to be only used once

This is it. Look at it, you have just created a photoshop brush. First time i did I felt like I was cheated my whole life. IT’S SO EASY WHY HASN’T ANYONE TOLD ME

Time to edit the Good Boi to be more random, so it can be used as a Cool Fancy Pattern. Go into brush settings and change whatever you’d like. Here’s a list of what I do for patterns:
- under Shape Dynamics, I increase Size Jitter and Angle jitter by 5%-15%
- under Brush Tip Shape, I increase spacing by a shitload. Sometimes it’s like 150%, the point is to get the initial brush tip we painted to be visible.
- If I want it to look random and noisy, I enable the Dual Brush option, which acts like another brush was put on top of the one we’ve created. You can adjust all of the Dual Brush options (Size, Spacing, Scatter, Count) as you wish to get a very nice random brush to smear on your backgrounds

The result is as above. You can follow the same steps to create whatever brush you need: evenly spaced dots that look like you painted them by hand, geometric pattern to fill the background, a line of perfectly drawn XDs and so on.
BUT WAIT, THERE’S MORE
— PATHS —
But what if you want to get lots of circles made of tiny dots? Or you need rows of triangles for your cool background? Photoshop can do all of that for you, thanks to the magic of paths.
Typically, paths window can be found right next to Layers:


Draw whatever path you want, the Shape Tool has quite a bit of options. Remember, paths are completely different from brush strokes and they won’t show up in the navigator. To move a path around, click A to enable path selection tool. You can use Ctrl+T to transform it, and if you move a path while pressing Alt it will be duplicated.

Now, pick a brush you wish really was in place of that path you’ve drawn and go to layers, then choose the layer you want it to be drawn on. Then, click this tiny circle under the Paths window:

Then witness the magic of photoshop doing the drawing for you while you wonder how tf have you managed to forget about this option for the past 2 years

You can combine special brushes and paths for all sorts of cool effects. I mostly use them in backgrounds for my cards, but you can do whatever you want with them.

I hope that answers the questions for all of the people who were sending me inquires about the patterns. If you have any questions regarding this or any other Photoshop matter feel free to message me, I’m always up for complaining about how great and terrible Photoshop is C’:

So you might be saying: Lion why a guide on drawing black people? Well young blood it’s because a lot of people cant…seem…to draw…black people..Amazing I know.

Racist (caricatures) portrayals of black people have been around forever, and to this day people can’t seem to draw black people like they are human. If your artwork resembles any of the above even remotely your artwork is racist and offensive. If you try to excuse that as a stylistic choice you’re not only a terrible artist, but racist too!!! Congrats.

Whitewashing is also a problem. A lot of people refuse to draw black features on canonly black characters. While this example isn’t colored, lightening the skin-tone of a character is also considered whitewashing. So lets start with features!

Now all black people have different noses thats a no-brainer, but black noses tend to have flatter bridges, and wider nostrils. Please stay from triangular anime noses and small button noses. Your drawings should not depict black people with abnormally large noses. (Especially if you do not draw other characters this way)

If you feel like the way you draw lips on black characters is offensive or resembles a caricature,it probably does and you should change it. ABSOLUTELY AVOID PLACING LIPS AT THE BOTTOM OF THE FACE.

Hair is so diverse! Please get used to drawing braids, locs,kinks and coils! If you can learn to draw ringlets and long waves you can learn how to draw black hairstyles.

Add clips! Learn how to draw baby-hairs and never be afraid to add color Pinterest and Google are free my dudes! Also try using square brushes for blocking in coils.
OK THAT’S ALL YOU GUYS

Hello :D I was wondering, how do you make outlining not look so harsh and out of place when it comes to digital art?
So for lines my style (1), for lines to not look hard I depend a lot on the how hard I push my pen down on my tablet ex.

So if you don’t want your lines to look too harsh put less pressure on your pen.
But there are other ways to make your lines appear more softer like this is my line art layer rn right?

you add skin color

then make a new layer on top of the line layer and clip the layer and add colors to the line.

that usually helps with making the lines look less harsh. I also suggest not using black for lines :000
For painting wise
Keep reading
Made this for a friend who needed some help with fire animation, figured it might be useful to someone else
this is how I approach any fire animation I do timing-wise and design wise. if I am doing something more cartoony I will use shapes that are suited to more flowing smooth transitions and a nice graphic look, if I am animating more realistically I will use more chaotic timing and a design that works better with the slight motion blur I always apply to realistic fire. real fire doent flow nice and smooth like water or smoke when viewed at real-time
I almost always animate fire on 1′s, though the cartoony fire can work on 2′s, you just have to be more careful of pops.
you can also animate more realistic fire with a slower timing, you wouldn’t want the above fire in the background of a calm scene. this is just an example using an extreme case.
Hope this helps someone who is struggling to rough animate fire that fits their specific style and scene timing.

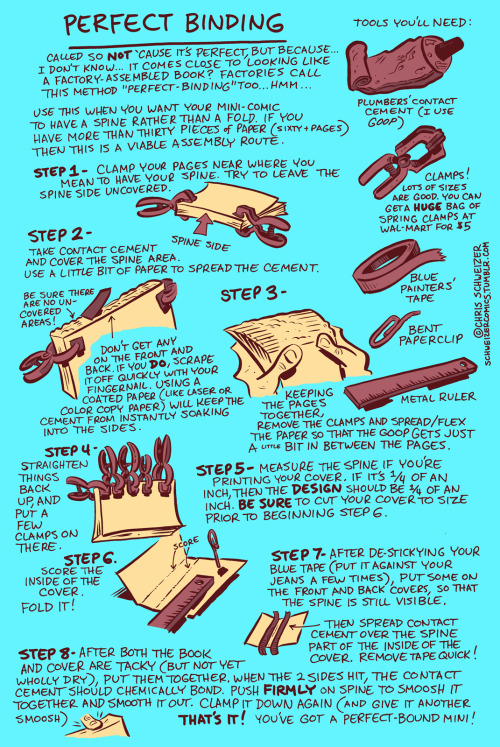
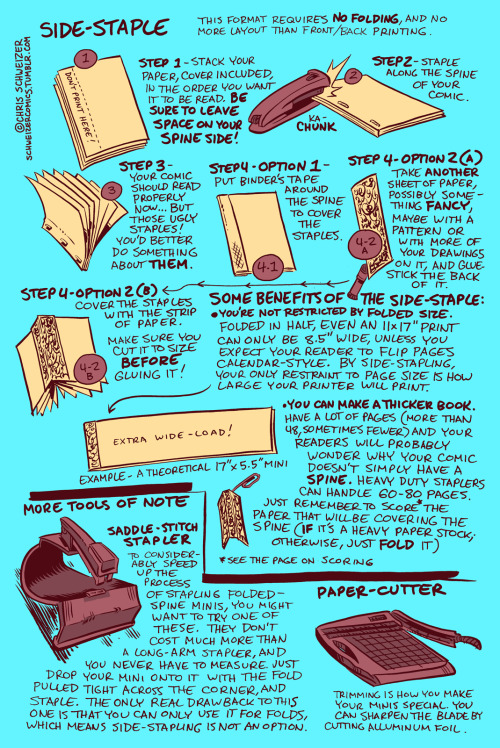
Cleaning out my filing cabinet, I found this handout that I made for my mini-comics class. Hope it’s helpful! Remember, it ain’t only for comics. Self-publish short stories, collections of drawings or sketches, or blank for journals/sketchbooks, etc.